Step 8: All that's left to do is make some coffee and get out the butter, your favourite jam and some Swiss cheese [Appenzeller anyone?]. Cherie also recommends including mandel muss [almond butter - like peanut butter but better, she says] to make it a truly Swiss breakfast.
 Step 7: Brush with egg yolk to give them that wonderful colour and glossy finish. Bake at 180 C for 30 - 40 minutes or until golden brown and sound hollow when tapped on the bottom.
 Step 6: Place the 2 finished loaves on a baking tray lined with baking paper.
 Step 5:
 Tuck the ends under and finish off neatly. Repeat the plaiting process with the other piece of dough.
 Step 4:
 Continue crossing over the ends until you've formed a beautiful plait.
 Step 3:
 Repeat with the other 'snake' and you're on your way!
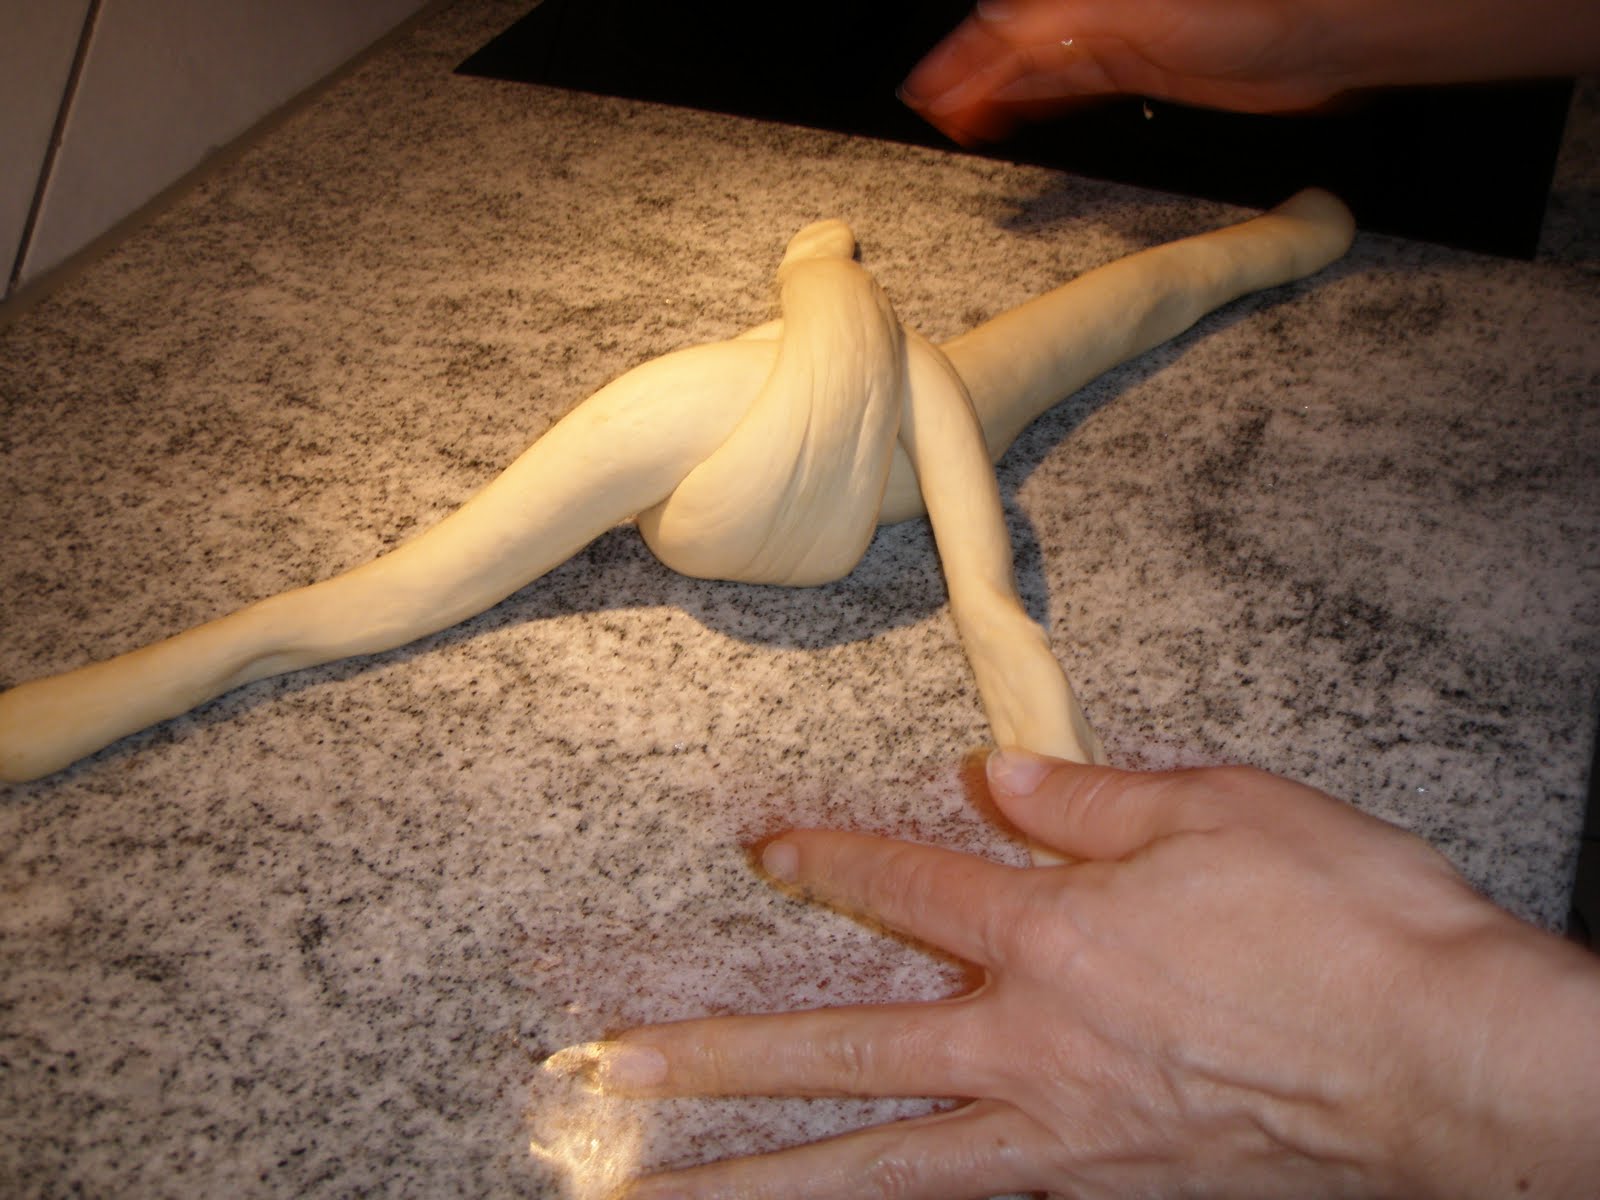
 Step 2:
 Put one 'snake' on top of the other to form an 'X' shape. Then take the ends of the 'snake' that is on the bottom and cross them over.
 Step 1:
 Divide the dough in half. Take one of the pieces and cut it in half. Roll into pieces into 2 long 'snakes' with a thicker section in the middle.
Zopf [pronounced 'tzopf']is a traditional Swiss bread with a beautiful texture and a rich taste. I consider our friend, Cherie, to be quite an expert at making zopf. I've been lucky to enjoy eating it many times and watch her making it at her place in the Swiss mountains [the full Swiss experience!].
She was given the recipe from a Swiss farmer, who had gone to hausfrau school for 2 years to learn how to make zopf, among other things, and run a household. Amazing but true. It makes the recipe all the more special.
The recipe will make enough for 2 large loaves; 3 medium loaves; 4 small loaves or a lot of small buns. Of course, you can be as creative as you like and form it into whatever you want to. The traditional way is to plait the loaf as illustrated by Cherie in the photos. Once you work it out it's not that hard and the result is spectacular - so don't be scared. Cherie says that the cheats way is to twist the 2 'snakes' together and then double it over and twist it together again, so it appears that there are 4 strands plaited together.
Swiss Zopf
1 kg white flour
600 ml full fat milk
100g butter
1 tablespoon salt
42g fresh yeast
1. Melt butter and leave to cool.
2. Crumble the yeast into a cup with a little of the milk.
3. Put flour into a very large bowl.
4. Make a well in the centre and a little ledge on the edge of the well that's big enough to hold the salt [as the yeast doesn't like the salt and therefore should be mixed in last].
5. Pour the salt around the ledge.
6. Pour the milk, the yeast and milk and the cooled butter into the well.
7. Stir, gradually mixing in the flour [try to keep the the salty flour until last] - a fork works well for this.
8. When the dough has come together, turn out onto the bench and begin kneading [this will take a while, perhaps 20 minutes]. Cherie says not to stop "until it resembles a smooth baby's bum". She says that "there seems to be a magic point where it all comes together and is smooth, pliable and elastic".
9. When you think the dough is ready, test for readiness by making a cut down the middle of the dough with a sharp knife. Part the dough and check the holes: if they are of equal size your ready to go to the next step, if not keep kneading!
10. When the holes in the dough are equal, place it in a clean bowl and put in a warm spot to double in size. Place a clean damp tea towel over the top.
11. When it has doubled in size, tip it onto the bench and cut it into however many portions you require. Then get rolling and plaiting or whatever you decide to do.
12. Place on a baking tray and brush with egg yolk.
13. Bake at 180 C for about 30 - 40 minutes or until they are golden brown and sound hollow when tapped on the bottom.
Note: We recently bought 'Paris: A Personal Guide To The City's Best' by Shannon Bennett [chef at Vue de Monde, Melbourne], and while doing some research for our upcoming visit to Paris I came across his recipe for Zopf.
I was surprised - pleasantly! Firstly, as it's not a bread that seems to be commonly known and secondly because the recipe was included in a book that focuses on the French capital as I don't consider it to be a French bread. It was interesting to know [I assume] that it is also made in France - or, at least, perhaps, certain regions. I'm always interested to learn how certain recipes have travelled between countries in Europe to be adopted and adapted.
Shannon describes Zopf's origin as Austrian - a 'poor man's brioche'. It is very brioche - like. He says his favourite way to use Zopf bread is for Wagyu beef burgers. For this he makes the Zopf dough into rolls.
It does make fantastic sandwiches as well. My favourite is Gruyere, a little Japanese mayonaisse and marinated artichokes. It all works together so well.
So, here's Shannons recipe, to compare:
2 cups water
70g powdered milk
1/4 cup sugar
15g salt
40g fresh yeast
100g butter
900g plain flour, sifted
100ml egg yolk, lightly beaten
The method is basically the same as Cherie's recipe [in the post above], except that he adds everything into the bowl together [doesn't melt the butter or dissolve the yeast], combines it and then beats using a mixer with a dough hook.
After proving he divides the dough into 40g portions for bread rolls and rests for 30 minutes before glazing with egg yolk and baking for 10 minutes at 220C.


 In my neighborhood of Teneriffe there are many cafes, restaurants and bars - and a convenience store that stocks standard supplies. So, you can imagine the excitement when the Sourced Grocer appeared about 10 steps from the back of my building.